
Stop Using Calendly – How To Use Google Calendar Appointment Scheduling
How your Google Calendar can replace Calendly!! Using the Google Appointment Scheduling in your Google Workspace Calendar.
QUICK LINKS: 00:00 Intro | 00:34 What are we gonna use instead | 02:53 Who can use it | 04:41 Create a Scheduler + Edit Settings | 11:03 Share the Scheduler | 13:45 Use it for MiniSession | 14:29 Close
Hi there! I’m Lauren with The Smarter Creative – I love helping creative small business owners work smarter in their business, not harder. I am so grateful you are here!
Today I want to share with you a feature inside of Google Calendar – one that, when I found out about it, my head nearly exploded out of excitement for what this could mean for small business owners who are just getting started and trying to figure out the systems that they need. So let’s talk about it!
What We’re Going to Use Instead
If you’ve chosen to run your email through Google, inside of your Google G-Suite/Google Workspace account, and you pay to have a custom domain email hosted through Google, you will have this awesome feature: appointment scheduling.
This feature allows you to send a link to your appointment scheduler and allows them to book a call directly with you, whether that be a call, Google Meet, video link, in-person meet-up, or whatever it may be.
When people are just getting started and aren’t quite ready for a full CRM, these calendar schedules are helpful for you and your lead to find a time that works well for both of you without having to email back and forth to figure it out.
I usually recommend Calendly which has a free option for one type of call, which again, is great if you’re just getting started. However, if you’re already paying for a Google Workspace account, don’t bother with Calendly and use this instead to streamline your overall process. Plus it’s one less thing to have to log into and manage! Win-win.
Now, if you are a Dubsado or a HoneyBook user already and you do your scheduling inside of your CRM, this will not apply to you unless you have some weird one-off thing you want to schedule without it being in your CRM.
Who Can Use It
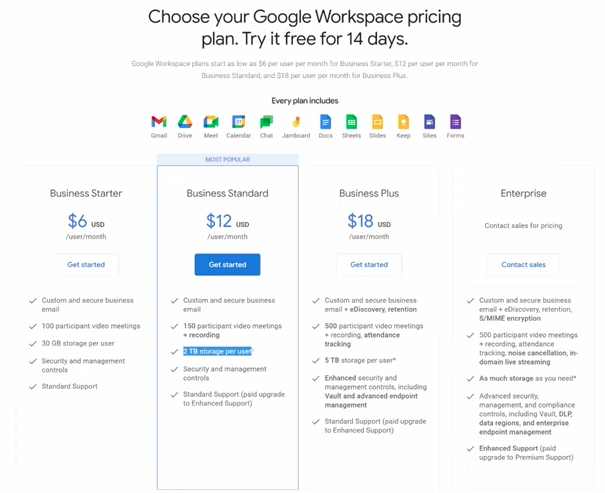
Google Workspace (formerly G Suite or Google account) has a handful of options available with various options and prices available. I have the Buisness Starter account for a couple of my businesses, and I use the Buisness Standard account for The Smarter Creative. I love this upgraded option because it allows for two terabytes of storage per user, which is huge.
The Business Standard option also allows for additional features during Google Meets that aren’t available in the lower level account including a Q and A feature, breakout rooms for calls, hand raising feature, and my meeting recordings are automatically saved to my Google Drive account.
Under the Google Calendar setting, you will see the appointment booking page available in the $12/month Business Standard option, but not the $6 Business Starter option.
For me, the $12 a month is completely worth it to replace Zoom and Calendly and allow for a streamlined booking page. I do use Dubsado for clients and paid bookings, but I use my calendar appointment scheduling for other calls as needed, which is an excellent feature to have.
P.S. I’m just sharing my opinion and experience here – not paid for sharing this by Google or anything at all.
Create a Scheduler + Edit Settings
Below are all the options available within the scheduler settings. If you’d rather watch me walk through setting it up, watch my walk-through video here.
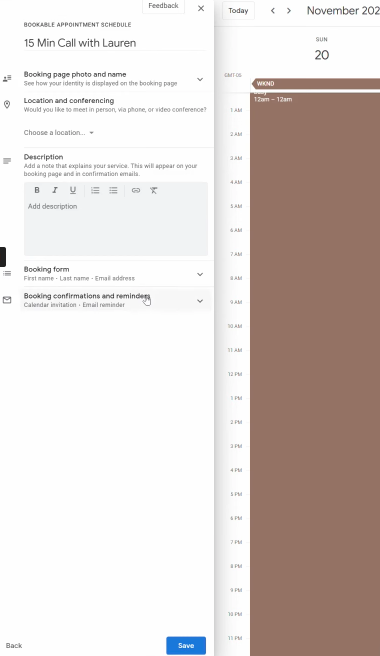
To set up a scheduler:
- Go to Google Calendar.
- Click Create, then select Appointment Schedule.
- Name the call/appointment you’re creating (i.e. Call with Lauren, or whatever works for you).
- Select the appointment duration.
- Set your general availability based on your schedule.
- Choose which days to have available, which to block out completely, and select specific time frames within your available days.
- Set up your scheduling window.
- Select a start and end date for availability. If you are open to scheduling on an ongoing basis, you can decrease the number of days people can book in advance on your calendar.
- Choose how soon someone can book an appointment so you have a buffer if a new booking comes up suddenly. You can adjust this depending on how you work and how much time you need to prepare.
- Set your adjusted availability.
- Adjust or block your availability as needed for any specific dates or hours you have available (i.e. vacations, holidays, etc.)
- Set up your booked appointment settings.
- Set a buffer time between appointment times or only allow appointments to book at the top of the hour, etc.
- Select how many bookings you want to take in a day, then when that limit is reached no other bookings are allowed the same day.
- Optional: Change the color or add a booking photo if you’d like.
- Set your location, whether that be Google Meet, in-person, phone call, etc.
- Set up booking form information.
- You can set up required email verification if you were getting weird spam accounts coming through your scheduler, but this may not be necessary.
- And finally, set up booking confirmations and reminders.
- You can set up a confirmation email to go out, as well as multiple email reminders in addition to the standard ones.
Hit save and you’re done!
Share the Scheduler
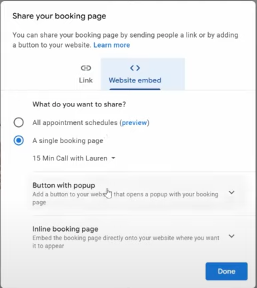
There are two ways to share your scheduler:
- Copy the website link
- Grab an embed code (either a button with a pop-up or an inline booking page)
If you have multiple types of booking schedulers, you can either share all of your booking options or choose a specific one to share only.
Once somebody books via your scheduler, it will show up on your calendar as an appointment. I love how easy it is to share or embed the scheduler!
One thing I will note is that you can’t collect payment with this feature, but it’s perfect for booking quick intro calls or whatever you may be offering your leads.
Use it for the MiniSession
If you wanted to offer mini sessions, like mini photo sessions, for example, you can use the 15-minute slot option for clients to book appointments with you. You can have appointments available every 15 minutes for scheduling, but again, you cannot collect payment with the scheduler, so you’d need to send them an invoice a different way like through Stripe or PayPal.
I would highly encourage you to do this type of scheduling inside of Dubsado, so you can automate everything, collect payments, and have everything in one place. But, sometimes you gotta work with what you got, and if you’re just starting or need something simply to book calls, this is an awesome and affordable option to keep in mind.
Need Help in your creative small business? I’m your girl.
I love helping small businesses get their messy backend systems organized. If you feel like you’re a mess and you need help with your systems, whether that’s Google Workspace or a full CRM like Dubsado, I’d love to help!
Schedule a free clarity call with me to see how I could help you and your business – whatever that means for you.
Are you ready to sign up for a Dubsado account? Get 30% off your first month or year of Dubsado here. Or, if you’re leaning more toward HoneyBook, get 20% off your first year of Honeybook here.
")