How to Automate Your Proposal Follow-Ups in Dubsado
Let’s chat about how you can Automate Dubsado Proposal sending and follow-ups.
In a lot of conversations about Dubsado, I hear people say ‘I send contracts and invoices to my clients and get paid. What’s the big deal with proposals?’
Here’s the deal: When you use proposals in Dubsado, in one link you’re able to join together the proposal, the contract, and the invoice. Not only does it make it a one-stop shop for your client, but it also allows you to use workflows to easily follow up with the proposal.
Why Automate Proposal Sending
A lot of entrepreneurs tend to miss out on follow-up with leads, either because they feel bad or don’t want to pressure them.
I love having an automation that automatically follows up for you. It provides a service to that lead who said they were interested in working with you. You’re serving them when you check in a few days later and say, ‘Hey, do you have any questions for me?’ or ‘Hey, I sent that email the other day. Did you get it? What are you thinking?’ Making yourself available to answer questions for your leads is a good thing.
So, today I’m gonna show you how to create a workflow that sends a proposal to a lead, follows up on it, auto-archives it, and starts the other workflows when the job is booked. Let’s jump into it!
Build the Parts of the Automation
I used Notion, my go-to dashboard for building out systems, to outline everything I wanted this workflow to do before I went into my Dubsado to do it. I’ve done all the legwork beforehand to make creating a workflow in Dubsado an easy and clear process.
I do have this Notion Dashboard for sale, if you want to use it in your business you can snag that here, but you don’t have to have it. You can follow along with the workflow steps below, or watch the video walk-through here if you’d rather.
I will note that I had already built out the proposal, canned emails, project statuses, and other workflows that I reference below in my workflow action steps. I mention two workflows I’ve already created – one is a Contract Follow-Up workflow and one is a Job Booked workflow.
If you don’t have those things created in your Dubsado already, you can do those first. Those are the key pieces. You need to build the pieces of your puzzle first, and then you can put the puzzle together. The puzzle is the workflow.
The Workflow
Again, you can follow the steps below or if you’d rather watch me walk through this you can do that here.
On your Dubsado Dashboard, go to Templates then Workflows. Click ‘Add a new workflow’.
Name your Workflow. I named mine ‘LEAD: Send Proposal’.
Under Payment Plan, select a payment plan from the drop-down menu, because we will have a trigger in the workflow based on that payment plan. You want to make sure your proposal does not have a payment plan inside of the proposal settings.
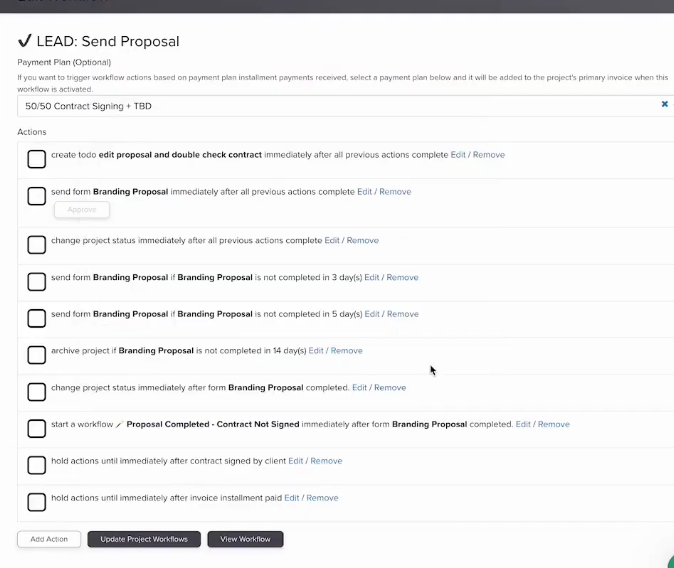
Now, for the action steps of the workflow. By the end of the process, you should have an 11-step workflow.
- Add Action > Create a to-do. In the reminder section of the action step, add a note to ‘Edit the proposal and double-check the contract’. You can assign this to-do to yourself.
- Add Action > Send Form. Select your Proposal form to send and select a canned email for sending proposals. Require approval before completing this action. Once this workflow is live, a to-do will get created, but this won’t be sent until the to-do is checked off and you have approved the action.
- Add Action > Change Project Status. Change the project status to ‘Lead: Contract Sent’.
Next, we’ll send 2 follow-up emails when the form is not completed.
- Add Action > Send a Form. Send 3 days after the form is not completed. Under the form to look for, select the Branding Proposal. Select a canned email written to follow up about the proposal.
Note: When you apply this workflow to your project, only one branding proposal will go to the project; it will not be there multiple times. It will just keep sending the same one that’s already on the project.
- Add Action > Send a Form. For this step, send it 5 days after the form is not completed. Select Branding Proposal as the form to look for again, and select another canned email written to follow up with the client about the proposal.
Note: These steps and the number of days selected have to go in order. If you want your first follow-up to happen at the 5-day mark first, then the 3-day mark after that – these triggers will not work as you want. The steps will always go sequentially in the lowest amount of days first, so make sure you’re doing that in your workflows.
- Add Action > Auto-archive project 14 days later if the form is not completed. This will archive the project and close out their invoice, but don’t worry – there’s always an option to unarchive it later if needed.
Those steps were all assuming the client lead did NOT complete the proposal, but the steps below will come into play if they did complete it.
- Add Action > Change Project Status as soon as the form is completed. I use my project status called ‘Waiting on Payment’.
- Add Action > Start a Workflow as soon as the form is completed. I use my premade workflow called “Proposal Completed, Contract Not Signed”. This is handy if someone were to start the proposal and booking process, but walk away from their computer or forget to finish it. This workflow will send a reminder to them 24 hours later.
Note: If you want to see how to add this workflow to your Dubsado yourself, you can watch that video here: Dubsado Workflow – Contract Follow Up after Proposal Completed
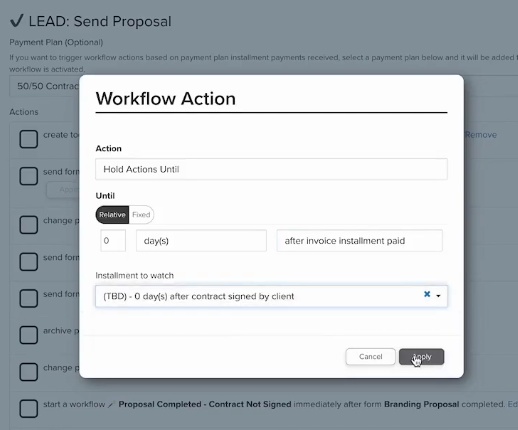
- Add Action > Hold actions until the contract is signed by the client.
- Add Action > Hold actions until invoice installment is paid. Select the payment plan installment you want to look for for this action step. This is why we select the payment plan on the workflow at the beginning.
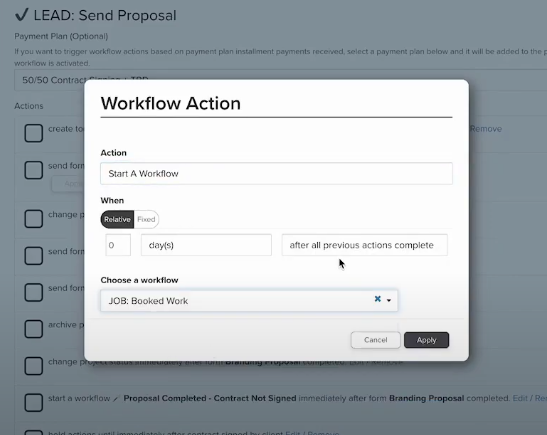
- Add Action > Start a Workflow. I use my already created workflow ‘JOB: Booked Work’.
Your full workflow looks like this:
You’re done! 🎉
When this workflow is added to a project, you can add and customize your follow-ups for that client as needed, whether it’s adding more follow-up emails or not following up so quickly. But after this workflow template is created once, you just need to add it to a project and you can make other adjustments from there inside of the project.
Needing More Help in Dubsado?
I hope this has been helpful to see the workflow process step-by-step. If you’ve read this or watched the walk-through video here and are still super overwhelmed, that’s what I’m here for.
I’d love to help you streamline your Dubsado and get it up and running as well as it can be for you and your business.
If you’d like to hop on a free clarity call with me, I would love to chat with you to see if we’re a good fit. You can book that call at https://www.thesmartercreative.com/call, or snag my Dubsado Workflow Dashboard here.
")